What is an Install Wrapper?

If you automate your application installs then you will probably have used an Install Wrapper.

When installing something in an unattended (i.e. automated) way, often there is a simple, single command line that you can use. For example the following single command line will install 7-Zip with a basic msiexec User Interface (UI) whilst ensuring the install doesn’t trigger a reboot,

msiexec /i "C:\Path\To\7z920-x64.msi" ALLUSERS=1 /norestart /qb-

This command line is generally inserted into you your deployment tool of choice to deliver the software to your Windows endpoint (we use Altiris DS6.9 and Altiris CMS7).

But what if your unattended installation has a pre-requisite? Or what if after the installation you need to perform a task or install a post-requisite?

This is the point when most software packagers start writing a batch file. To illustrate, below is an example of a batch file which will install iTunes with its pre-requisites:

REM a batch file
msiexec.exe /i "C:\Path\To\AppleApplicationSupport.msi" ALLUSERS=1 /norestart /qb-
msiexec.exe /i "C:\Path\To\AppleMobileDeviceSupport64.msi" ALLUSERS=1 /norestart /qb-
msiexec.exe /i "C:\Path\To\iTunes64.msi" TRANSFORMS="C:\Path\To\iTunes64_ITS.mst" ALLUSERS=1 /norestart /qb-
REM end of batch file

Now imagine this batch file is called ‘Install_iTunes.cmd’ and that this is the command line that you used in your favourite deployment tool:

"C:\Path\To\Install_iTunes.cmd"

The batch file you have now created is an Install Wrapper.

An Install Wrapper can be created using any scripting or programming language and the objective generally is to ensure the application can be fully (and robustly) installed in an unattended manner on the target machine. (Please note that I do not use the word ‘silent’ in this regard; many software packagers use the words silent and unattended interchangeably in reference to application installations. This can be confusing as some vendor silent switch implementations only make the installation fully automated, i.e. unattended, and do not also actually make the install silent/invisible)

Install wrappers are usually required for one of the following reasons (although there are as many reasons as imagined scenarios):

Pre / Post-requisites
Pre / Post scripting, e.g: delete a file / shortcut, create a registry key
Pre-install condition checking, e.g: correct OS, correct computer name (or part of name)
Check the version of an installed pre-requisite, e.g: version of MS Office
Check if a user is logged on
Check if a program is in use by the user, e.g: in the event of an upgrade

Software install wrappers are often written to perform unattended software installs which require more logic or requisites than a simple silent switch.

If you use a endpoint management product it will often natively provide various UI features to help you ‘wrap’ your software installs without requiring scripting expertise.  For example with Altiris 7.5 we have conditions based on filters and compliance decided by detection rules. Endpoint management products however, can’t always handle the logic you need incorporated into your installation. In such scenarios you have your deployment tool of choice execute a wrapper script to manage the install instead.

The down side to Install Wrappers is that the more complex the application requirements and install phases become, the more skilled the programmer / scripter needs to be. And this can become a problem; we found that when we needed to hire packaging contractors we could only hire those with accomplished scripting skills. Consequently the hiring process became much more difficult.

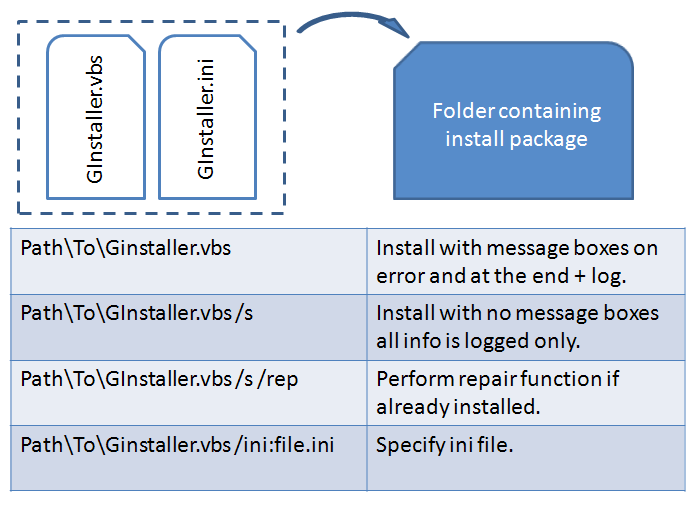
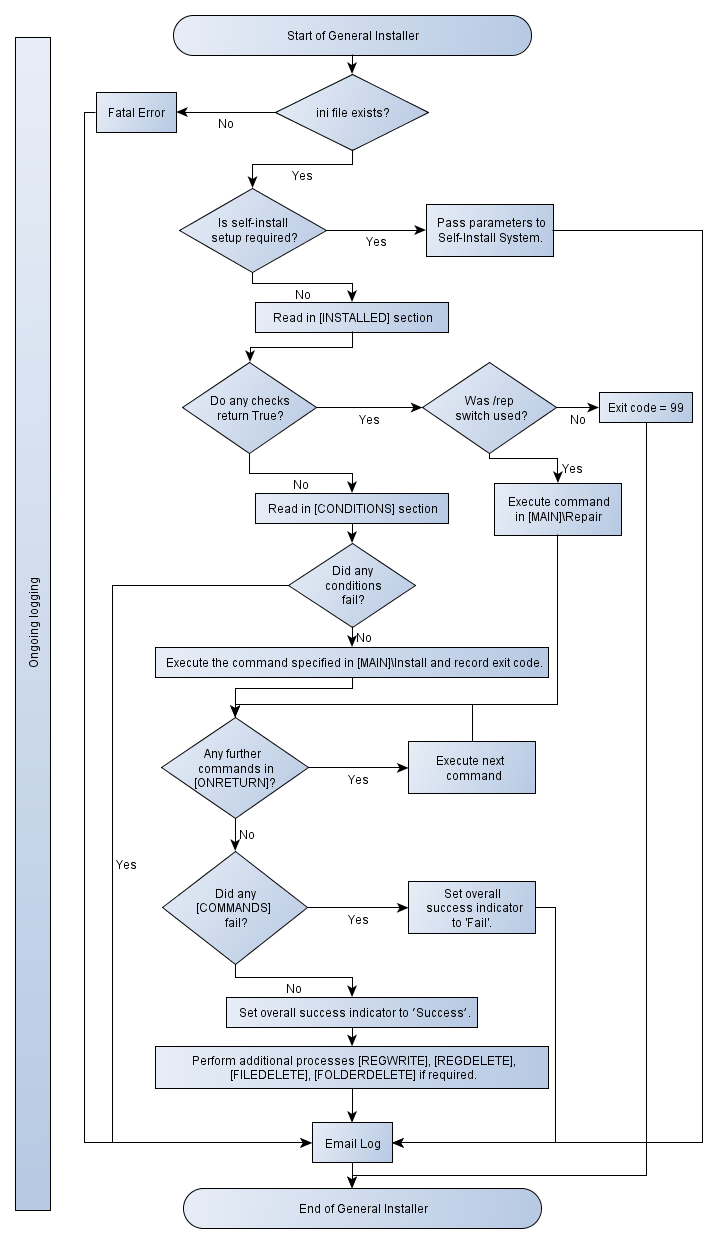
To mitigate this, I decided to create a simple-to-use VBScript based wrapper which would be driven entirely by an ini file. The aim was to remove the scripting aspect from the packaging team’s duties so that they would only need to edit the ini file (according to a reference I’ve written) to manage any software installation.  I called the resulting VBScript the ‘General Installer’, or ‘GInstaller’ (jee-installer) for short.  I will at some point document and release this to the community so that maybe more packagers can benefit from this as we have.

So to summarise, an Install Wrapper is the program or script that you use to execute your installation including any additional programmed logic, pre or post-requisites, and including any additional scripting tasks such as file or registry operations.

I hope that you found this useful!


(Note: originally published on Symantec Connect.  Symantec was bought by Broadcom and this post was re-published in Broadcom Communities)

Posted in Work | Comments Off on What is an Install Wrapper?

CustomActionData example – quick reference

“Look I know about msi’s, just remind me how to do it with an example!”

Ok I hear you – most web references either don’t give an example or force you to read all the theory first!  Here you go …

1. Create a type 51 custom action to store the property you want to reuse in deferred execution.  It’s property name (Source column) must be the same as the custom action name that will use it later in deferred execution:

Action Name Type Source Target
StoreUSERNAME 51 vbsDisplayUsername [USERNAME]

2. Put the new type 51 action with immediate execution in the InstallExecuteSequence somewhere.

3. Custom action in deferred execution references the stored information.  It’s Action Name must be the same as property being set in the type 51 action (Source column):

Action Name Type Source Target
vbsDisplayUsername 1062 MsgBox “->” & Session.Property(“CustomActionData”) & “<-“

4. Put the second deferred action after the first in the sequence and the embedded VBScript should display the content of the property, in this example the username.

If you want detail about how and why this works – get Googling!

Posted in Work | Comments Off on CustomActionData example – quick reference

Install Wrapper – what’s that?

My pet GInstaller is quite mature in terms of how much it is used in our environment and also how robust it now is.  And although (years) overdue I will be publishing it soon [1].

But in the mean time it occurred to me that I may not have adequately explained exactly what I mean by an ‘Install Wrapper’. Previously I have explained it as follows:

“An Install Wrapper is the program or script that you use to execute your installation including any additional programmed logic, pre or post-requisites, and including any additional scripting tasks such as file or registry operations.”

That definition was the summary concluding a blog entry I have written on the Symantec ‘Connect’ community forums. Here is a link to that post:

http://www.symantec.com/connect/blogs/what-install-wrapper

Since Symantec was taken over by Broadcom in late 2019, the blog entry linked above can now be found in this blog too in order to protect it from further takeovers / mergers etc:
https://blogs.it.ox.ac.uk/darrencollins/2020/04/07/what-is-an-install-wrapper/

I hope you find this useful.

[1] In the coming months. Maybe if I keep promising it I might feel compelled to dedicate time to doing it!

Posted in Work | 3 Comments

See you soon (hopefully!)

As you can see I have woefully neglected this blog. Work is so busy that I just don’t have the time to dedicate to quality blog entries.

Therefore this blog is now archived. Hopefully in the future I will revive it and be able to continue to write about applications packaging and deployment.

Darren.

Posted in Work | Comments Off on See you soon (hopefully!)

I Love Adobe

Well knock me down with a feather: Adobe have produced an excellent administration tool that is brilliant for apps packagers and sys admins.

The tool can be downloaded from here http://kb2.adobe.com/cps/837/cpsid_83709.html (click the Administrator’s Information Manager link).

Once installed (it is an Air application grrr)  it is an encyclopaedia of information for people that need to distribute Adobe Acrobat and Adobe Reader.

Like many apps packagers I use, amongst others,  http://www.appdeploy.com/ to get information on software that other packagers out there have already unearthed.  The Adobe Reader pages have had many contributors over  the years (including me), and they have many registry settings that people have set to control their installations and make them more professional (e.g. losing Acrobat.com integration, switching off auto-updates, opting out of the opt-in etc.).

But not all the settings are explained, and I ended up being guilty of bunging in registry values that I didn’t have time to fully investigate because everybody else was.

But now the new tool has a complete reference of all* the registry values that can be used to amend the installation.  Some of the information has typos, e.g. the bDisplaySplash setting should say bDisplayedSplash and LoadOnStart should be bLoadOnStart, but the information is still extensive and explains what each setting is for.

Adobe’s own packagers have also pulled their socks up – they offer the msi as a direct download now and the files are no longer in an external data1.cab file.  Let’s hope they keep that up.

And more good news!  The Adobe Customization Wizard X is actually really useful.  When I used it and installed the result, I found that it put down many of the HKCU settings on first run that I used to add-in manually.  In fact I only ended up adding two more: one for bDisplayedSplash = 0 and the second for OptIn = 0.

SO: well done so far Adobe, keep up the good work!

* all ?  Really?  Well certainly a boatload of settings!

Posted in Work | Comments Off on I Love Adobe

I Hate Adobe

Anyone who’s ever done any serious apps packaging and deployment will probably share this sentiment.  I am not going into any detail on this now: this post is mostly a comic prelude to the next post … http://blogs.it.ox.ac.uk/darrencollins/2011/06/17/i-love-adobe/

Posted in Work | Comments Off on I Hate Adobe

MiKTeX 2.9 – Packaging and Deployment

Quote from http://miktex.org/about:

About MiKTeX

MiKTeX (pronounced mick-tech) is an up-to-date implementation of TeX and related programs for Windows (all current variants).

I’m afraid I don’t know how to use the software, but later on I’ll you’ll see the simple test I did to check the software was working at a basic level.

1. Download

First I downloaded the MiKTeX setup [setup-2.9.3959.exe] from here:
http://miktex.org/2.9/setup
… using the “Installing the complete MiKTeX system” link (5.51MB).

Then to download all the MiKTeX packages, I ran:

"path\to\setup-2.9.3959.exe" --download-only

(All the command line options are documented here: http://docs.miktex.org/manual/setupwiz.html)
I used the FTP ‘mirror.ox.ac.uk’ option and pointed the GUI at a folder to download ALL the files to.
The download halted a couple of times, but I just reran the command line above.  One time I thought it froze (on the ‘cm-super.tar.lzma’ package), so I hit cancel and the restarted it.  The downloader automatically picked up from where it left off.  BUT after I restarted it, that file took a really long time to download for some reason.  It is about 64MB but the length of time it took still doesn’t seem justified.

2. Unattended Installation Command

The first major milestone of any packaging is to end up with a scriptable unattended installation.  The command line I last used when I packaged version 2.7 was:

"setup-2.7.3224.exe" --local-package-repository="path\to\Packages" --unattended --package-set=complete

.

… but looking at the command line web page I think that we may need a couple more:

"setup-2.9.3959.exe" --install-from-local-repository --local-package-repository="path\to\Packages" --shared --unattended --package-set=complete

.

4. Testing MiKTeX 2.9 is working

In order to test that MiKTeX is working I needed a test file.  I downloaded and installed GhostScript and GhostView from here, http://pages.cs.wisc.edu/~ghost/, then I found a test Tex file here: http://no-paste.ch/download/code_183.txt and saved it as ‘samplefile.tex’ (although the same file is available from many sources).

I double-clicked the sample Tex file and hit the ‘play’ button on the toolbar.  Within a few seconds I had a nice PDF showing me the delights of Tex.

I should just add here that we already have working versions of GhostScript and GSView packaged in an unattended installation.  I included the above download link for completeness.

.

3. Deployment of the Unattended Installation

I now have a package folder containing the following:

packages                          <folder>
setup-2.9.3959.exe                5779.46KB      04/04/2011 12:26:09

The packages folder contains  over 2,100 files that were downloaded as a result of the ‘–download-only’ command in step (1) above.

I have an installation wrapper I wrote (General Installer) that I have used to call the setup.exe command line in (2) above and log to a central server.  This now  perfectly performs an unattended installation.

We use Altiris Deployment Server 6.9 to deploy our packages and I have a job on there that will install MiKTeX without user interaction.

One problem I’ve had is that MiKTeX 2.7 is already installed on the computers that this needs to go to.  There is not (that I could find) an unattended uninstallation for any MiKTeX installations, so for the time being I am just deleting the MiKTeX 2.7 icon group from the Start menu at the end of the MiKTeX 2.9 installation.


Posted in Work | Tagged , , , , , | Leave a comment

The General Installer (GInstaller)

I have finished the main coding of my ‘General Installer’.  Now we are applying it to live packages and it looks like it will become very useful indeed.

We refer to it as ‘GInstaller’ so that is now the name: GInstaller, short for General Installer.

Some more information on GInstaller:

What is it?

GInstaller is a deployment tool to intelligently install programs and applications with full logging.  It is a VBScript that acts on an input ini file.  It can:

  • Check if the install is required
  • Check a number of pre-install conditions against criteria specified
  • Execute a sequence of command lines acting on specific exit codes
  • Set up a user self-install icon for them to install at their convenience
  • Generate a ‘hidden’ re-install icon for IT Support staff
  • Comprehensively log each step of the installation
  • Email the log at the end to a specified email account
  • Perform simple post install tasks such as creating / deleting registry values, deleting files and folders (e.g. delete extra shortcuts installed but not desired)

GInstaller is designed to enable complex intelligent deployment of programs and applications without complex scripting knowledge (or any scripting knowledge at all!).

How is it used?

The GInstaller.vbs script and the associated, configured, GInstaller.ini file are placed into the folder with the packaged unattended installation files.

The package folder should then be deployed to the local computer using the deployment tool of choice and the GInstaller.vbs called by the deployment tool from the local folder.

General Installer use

ICTST deploy the source locally prior to installation.  There are pros and cons to this method, but we have found that for reducing problems and improving supportability, this is the best option for us.

Show me!

An example ini file can be viewed here:

http://users.ox.ac.uk/~oucs0058/res/blog_oucs/Sample_GInstaller.ini

This is not a working sample just a reference of all the options that can be used.  In practice a real example is less than half the length of this example.

GInstaller is fully documented, but at this stage I can’t release the document to everyone.  (If you work for Oxford then I can let you have a copy of the document – just email me).

As for releasing the GInstaller script itself – this is still very early days and little bugs are still popping up regularly.  In  the future I plan to release for open use.  Please contact me either by email or the comments section below if you are interested in hearing more.

Below is an outline process flow chart of the General Installer:

General Installer flowchart

General Installer flowchart

Posted in Work | Tagged , , , | 2 Comments

The ‘General Installer’ – Installation Wrapper

Now I’m working on something interesting.  It’s working title is the ‘General Installer’ script.

The script is basically a universal wrapper to install applications or anything else, but also give you the flexibility of pre-process scripting without the scripting, as well as logging and recording the exit of each install process.

Let me take an example: PDF Converter Pro version 5.  This installation is msi based from the vendor, and to install you need to:

  1. Install .NET Framework 3.5 if required
  2. Install MS Virtual C Runtime if required
  3. Install PDF Converter Pro itself

… but ideally you need to do this:

  1. Check if PDF Converter Pro 5 or newer is already installed
  2. If above is true, log it and send log to central location.  If not …
  3. Install .NET Framework 3.5
  4. Record exit code of above
  5. If .NET install failed, log it and send log to central location.  If not …
  6. Install MS Virtual C Runtime
  7. Record exit code of above
  8. If above install fail, log it and alert somehow.  If not …
  9. Install PDF Converter Pro 5
  10. Check exit code: was a restart required?
  11. Log result and send log to central repository.

Here’s another (fictional-but-based-on-fact) one: a Firefox plug-in that will only work if Firefox 3.1 or newer is installed, but will not work if Firefox 3.6 or newer is installed.  In this case we need:

  1. Check if this plug-in is already installed – log etc.
  2. Check if Firefox is installed
  3. Perform a programmatic version check if Firefox is installed that is newer than 3.1.0.0 but older than 3.6.0.0 (not as easy as you think)
  4. Install plug-in
  5. Log result etc.

All of this checking and logging can be added on into an mst transform – but that means you have to launch the installer, and wait for it to go through the checks, and then get it to abort if needs be.  Have you ever tried to get an msi installation to abort nicely and report back a friendly (custom?) exit code?  It is not possible to get it to return that sort of information to a wrapper or, for example, an Altiris DS server.  You can get nice custom messages into the event log of the computer, but as for custom meaningful exit codes, forget it.  And what if you have a non-msi based application and you don’t want or need to repackage it as an msi?

So I wrote nice wrappers.

Over the last two-and-a-half years I’ve been here, I’ve written a wrapper VBScript for every installation I’ve performed: these install the pre-requisites, do the pre- or post-scripting checks and tasks, logging, alerting, aborting and returning custom exit codes back to Altiris DS or NS.  Ok, most of the scripts are merely tweaked versions of  previous scripts, which was fine, because I was the only packager, they were my scripts and I could amend one and knock out a new one really quickly.

But now the work has increased and we have another packager.  Over the last many months he has got used to my way of doing things with tweaking and amending VBScripts for every installation.

But now there is a short term project and a couple of contractors will be packaging to our standards.  Therefore to train these guys to our way of doing this is a waste of their time and our money.

So I need a way to perform these pre- and post-tasks without amending and re-saving an actual script.  Ideally no VBScripting skills should be required at all.  That’s when I came up with the idea of the General Installer.

The General Installer is a VBScript, but a static one, that can cope with any (?) situation you need it to cope with.  And all the criteria, and logging options, and multiple pre-requisite commandlines etc. can be entered into an ini file that is read by the installer.

The ini file is very simple to understand to do simple installer tasks, like:  check if already installed, install and log.  But is necessarily quite complex if the more complex tasks are required.

For example: An application has .NET Framework as a pre-requisite, but a hotfix to install after the main install.  So I need to ensure that each part is successful but ideally I want the main app install exit code to be reported back to Altiris, not the hotfix one – the main install might return 3010 (restart required) but the hotfix then returns 0.  I want to see the 3010.

Therefore I made it possible for within the General Installer ini file to choose which install commandline out of many to use as the ‘Master Process Return’ code.

This is still a work in progress and I hope to elucidate further as I go on.

Posted in Work | Tagged , , , , , , | 2 Comments

Automate IP printer port and driver install

I’ve just had a nice little scripting challenge to solve:

ICTST have all moved recently to nice offices off of the High Street.  We have a nice new printer here and no print server, so we needed to automate the installation of a local printer IP port and the driver for the printer.

After a bit of testing I came up with the following method.  I’ve used WMI to create a local IP port and then used PrintUI.dll to deliver the driver and setup the printer on the new IP port.  I could have used various WMI queries to do all of it, but I like the fact that PrintUI.dll was created for just this purpose and it does it very well indeed.

As I’ve scripted it below, the script needs to be in the same folder as the driver including the .inf file.  It has been tested on Windows XP SP3 only so far.

The script also outputs a message box if it finds a printer already on the IP address port specified.

I’ve generalised some of the details:

Set wshShell = CreateObject("WScript.Shell")
strCurrDir = Replace(WScript.ScriptFullName, WScript.ScriptName, "")
strIPAddress = "111.1.222.333"
strComputer = "."
strPrinterName = "RICOH MFP Office 2nd Floor"  '## Can be any text you want, this shows print dialogs.
strDriverName = "RICOH Aficio MP C3300 PCL 6"  '## MUST be the exact text as in the printer driver .inf file.
strLocation = "New Office 2nd Floor"           '## Can be anything
strInfFile = strCurrDir & "OEMSETUP.INF"       '## the full path to the printer driver .inf file.  In my example the VBScript was in the same folder as the driver & inf file.

Set objWMIService = GetObject("winmgmts:{impersonationLevel=impersonate}!\\" & strComputer & "\root\cimv2")
Set colPrinters = objWMIService.ExecQuery("Select * From Win32_Printer Where PortName = 'IP_" & strIPAddress & "' ")
For Each objPrinter in colPrinters
    MsgBox "Unable to install printer, printer already found on port 'IP_" & strIPAddress & "'." & VbCrlf & VbCrlf & "Found:  " & objPrinter.DeviceID, vbExclamation + vbSystemModal, "Printer Port already assigned"
    WSCript.Quit 114001
Next

Set objNewPort = objWMIService.Get("Win32_TCPIPPrinterPort").SpawnInstance_
objNewPort.Name = "IP_" & strIPAddress
objNewPort.Protocol = 1
objNewPort.HostAddress = strIPAddress
objNewPort.PortNumber = "9100"
objNewPort.SNMPEnabled = False
objNewPort.Put_

wshShell.Run "rundll32 printui.dll,PrintUIEntry /if /b """ & strPrinterName & """ /f """ & strInfFile & """ /r ""IP_" & strIPAddress & """ /m """ & strDriverName & """", 1, True

Set colPrinters = objWMIService.ExecQuery("Select * From Win32_Printer Where DeviceID = '" & strPrinterName & "' ")
For Each objPrinter in colPrinters
    objPrinter.Location = strLocation
    objPrinter.Put_
Next
WScript.Quit 0
Posted in Work | Tagged , , , , | 17 Comments