It is now possible to add the Recorded Lectures tool to your WebLearn site, without requesting this from the central WebLearn team. Here’s how:
- Login to your WebLearn site with a maintain role and click Site Info.
- On the Site Info page, click the Manage Tools button.
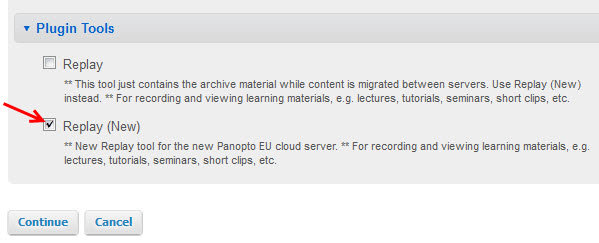
- The next page shows a list of tools available in the site. Scroll down to the bottom of the page and locate Plugin Tools and click the arrow next to it to see the Replay tool. (NOTE: During July 2016 this is called ‘Replay (New)‘ while we migrate the data to the EU cloud).
- Tick the check box next to Replay and click Continue button.
- Name the tool “Recorded Lectures” as suggested, and follow the on-screen instructions to add the tool to the left hand side of the page.
- If you want to move the Recorded Lectures link higher up in the menu, go to Site Info > Page Order, where you can drag the tool to the desired position, and click Save.
Staff (with the ‘contribute’ or ‘maintain’ role) can click Recorded Lectures to capture lectures or other presentations and edit them, if necessary. Students (with the ‘access’ role) can view the recorded lectures via the same link.
Useful links:
- Replay Help website: http://help.it.ox.ac.uk/replay
- Contact the central Replay team: replay@it.ox.ac.uk

