RDP: “The connection has been lost.”

This message was appearing a little too often for my liking:

download

“The connection has been lost. Attempting to reconnect to your session… “

In many cases this problem is caused by a feature known as Auto-Tuning. This is supposed to continually adjust TCP/IP receive window size based on the network conditions at any given moment. But on a less-than-perfect network this can cause time-out issues.

The TCP receive window size is the maximum amount of incoming data that can be buffered at once on the receiving side of a connection. The sending host can send only that amount of data before waiting for an acknowledgement and then a “receive window” update from the receiving host.

The TCP/IP stack nowadays tunes itself with larger default window sizes than it used to. Instead of using a hard-coded default value, TCP automatically adjusts the window size – beneficial during bulk data transmission by reducing the number of segments sent with large amounts of data.

Auto-Tuning continually determines the optimal receive window size by measuring bandwidth delays and the application’s retrieve rate. In an ideal world this means excellent performance even with changing network conditions. In the real world this means occasional timeout errors…

This doesn’t just affect Remote Desktop – some older version of Outlook used to get error 0x800CCC0F (“The connection to the server was interrupted. If this problem continues, contact your server administrator or Internet service provider (ISP).”) for the same reason.

What can be done?

To tweak your auto-tune settings:

Run CMD as an administrator and enter this command:

netsh interface tcp set global autotuninglevel=restricted

If you later wish to reverse this setting:

netsh interface tcp set global autotuninglevel=normal

To see what you’ve got right now:

netsh interface tcp show global

The permited values for the AutoTuningLevel parameter are:

disabled
Sets the receive window at the default value.
highlyrestricted
Lets the receive window grow beyond the default value, but does so very conservatively.
restricted
Lets the receive window grow beyond the default value, but limits such growth in some scenarios.
normal
Lets the receive window grow to accommodate most scenarios.
experimental
Lets the receive window grow to accommodate extreme scenarios.

N.B.  The experimental value may decrease performance and should only be used for testing.


Posted in Uncategorized | Comments Off on RDP: “The connection has been lost.”

RIP Smartscreen

Microsoft have included spam-filtering in Exchange for many years, under the SmartScreen name. But from 1st November that will change: there’ll be no more updates and the feature won’t be included in new versions of Exchange Server.

Updates for SmartScreen client-side spam-filtering for Outlook on Windows will also be ending, although SmartScreen will remain current in Microsoft’s web browsers. Despite sharing the name the in-browser feature protects against malicious websites.

If you’re using SmartScreen now the existing definitions you have will still be there, and will still work, but there won’t be any more updates to them after 1st November.

The motivation for this seems to be twofold – the blunt instrument of applying a spam-confidence level to an email isn’t very effective, and Microsoft’s online protection offering does a far better job. Realtime filters can react faster to spoofed email, hijacked accounts, and user feedback. Coincidentally Exchange Online Protection is chargeable for on-premises users, perhaps as a further incentive to move to Office 365.

There is no net effect on Nexus from this change (Oxmail does the job of spam-scoring for the University) but, as many of you know, messages categorised as legitimate can still end up in ‘junk’ because of Outlook applying filters – it’s why we’ve always advised that users set spam filtering via the SCL and not via Outlook’s SmartScreen. The absence of future updates mean that client-side spam filtering will only become less effective over time.

In the longer term Nexus’ move to Office 365 should ensure that Exchange Online Protection has an opportunity to take over spam-filtering responsibilities.

Posted in Uncategorized | Comments Off on RIP Smartscreen

The New York Times on email chains

This is some excellent advice on the subject of “When I’m Mistakenly Put on an Email Chain Should I Hit ‘Reply All’ Asking to Be Removed?”
https://twitter.com/bydanielvictor/status/771698039908CrWfRgTXgAEQHJE[1]

Posted in Uncategorized | Comments Off on The New York Times on email chains

“Why does Nexus send me spam?”

We have had a spate of spam making it into Nexus mailboxes recently, provoking a flurry of discourse on the ITSS-Discuss mailing list. To be able to stop spam more effectively there are some checks that IT Support Staff can do with their users prior to logging support tickets.

Spam detection isn’t as simple as virus/malware detection: there isn’t the same definitive certainty one gets when a virus’ signature matches a message’s attachment. To conclusively determine if a message is spam requires an understanding of context and language that is currently still far in excess of a humble computer’s capabilities. There is also a personal aspect – one person’s spam message is another’s crucial information. So spam isn’t deleted, no matter how certain we can be that that’s what it is. Instead we allow you to personally set your own tolerance to spam. If you do this correctly it will determine what goes into ‘Junk’ and what goes into ‘Inbox’.

Firstly though, here’s what is going on with incoming email:

ON ARRIVAL AT THE UNIVERSITY
New messages arrive at OXMAIL and are scanned. Details of Oxmail’s processes can be found here: http://help.it.ox.ac.uk/email/scanning/index and here: https://help.it.ox.ac.uk/network/smtp/relay/index

OXMAIL then sends messages on to their destination, which might be Nexus, forwarded to a personal email address outside the University, or to a departmental server.

ON ARRIVAL AT NEXUS
The spam score assigned by OXMAIL is translated directly into a Spam Confidence Level, or SCL. Each asterisk in the X-Oxmail-Spam-Level header is counted: the total becomes that message’s SCL. So this example ‘X-Oxmail-Spam-Level: *********’ would have an SCL of 9.

Nexus is able to automatically move spam messages into the Junk folder of your mailbox before you see them, but only if you tell it to do so. This is a two-stage process:

  1. Turn on the spam filter in OWA. This step often gets overlooked. Without doing this step any setting you apply won’t take effect. Instructions for doing this can be found here: https://help.it.ox.ac.uk/email/filter/index.
  2. Select your level of tolerance to spam. This is done via the SelfReg tool (https://register.it.ox.ac.uk/self/nexus).
    The higher the SCL is that you can accept, the fewer messages will be moved into Junk. The options equate to the following:
    OFF: All messages will go into your Inbox.
    LOW: Messages with an SCL above 7 will be moved to Junk.
    MEDIUM: Messages with an SCL above 5 will be moved to Junk.
    HIGH: Messages with an SCL above 3 will be moved to Junk.

WHY DO YOU TELL US TO TURN OFF JUNK FILTERS IN OUTLOOK? (or other email clients?)

The assessment of spamminess done by OXMAIL is logged, consistent, and repeatable. If two people are sent the same message, and have the same spam-filtering preference set, then the same thing should happen to that message for both people.

End-users’ applications aren’t so clear-cut. Each program can use widely differing technologies to assess spam and the software which scans it isn’t always the same version, even when the application is the same. Furthermore, messages that are moved to Junk by the email client application can’t be differentiated between a user choosing to move a message between folders or their software doing it for them. All that Nexus’ servers see is an end-user request for a message to be moved.

In other words Outlook, and others, can do a pretty good job of spotting and filtering spam after it’s delivered. But we can’t guarantee that your program won’t falsely-identify a genuine message as spam. We can’t guarantee that your experience will match that of the person next to you (do they update as often as you do?). We can’t see in our logs what process decided to move that message between folders.

By deactivating client-side spam filtering we can be sure that the only spam processing that does happen is recorded in message headers.  This gives us a fighting chance of diagnosing any issues with the process. If you do spam filtering in your application you are muddying the waters for us if things misbehave and you want us to help you to troubleshoot.

WHAT CAN I DO BEFORE LOGGING A TICKET?

  1. Check that the user has set spam processing in SelfReg AND has turned on spam processing in OWA.
  2. Review the headers of an offending message to see what Spam Score it has been given.
  3. Verify if the user’s application software, or rules processing, or macros, or any other such process might be doing additional spam processing / filtering.
  4. Ensure that the end-user hasn’t configured a whitelist within their email application that is over-riding the spam-processing values they have set.
  5. Record the outcome of these tests in the details when you log a ticket for us to investigate why you are receiving spam to your inbox.

nexus_itss_spam-processing[1]


EDIT 1st August 2016:

In the case of a shared mailbox SelfReg does not currently allow you to alter the spam preference – it is limited to the currently-logged-on user. However the Nexus team can manually apply spam preference values for you if spam becomes an issue within a shared mailbox.

Posted in Uncategorized | Comments Off on “Why does Nexus send me spam?”

Autodiscover: no longer optional

Executive summary: Outlook 2016 users may find themselves disconnected when Autodiscover is not present for your  unit’s domain name.

Over the last few months we have noticed a rise in the number of Outlook connectivity incidents reported to the helpdesk.  In many cases we are finding that the issue is linked to a combination of two things: the use of Outlook 2016 and the absence of a resolvable autodiscover entry for that individual’s domain name. We know that some units have delayed getting those records created, relying on the fact that you could still get basic Outlook-Exchange connectivity via legacy (unsupported) Exchange 2003 RPC over HTTP. This method no longer works in Outlook 2016 because this version has dropped support for Exchange Server 2003.

This has not been a significant support issue until now. It was around the time that email was being migrated from Herald into Nexus that we first sent a message to IT Support Staff requesting the creation of autodiscover DNS entries.  At that time we were suggesting it to primarily help brave souls with Outlook 2007. Today that advice still stands, but in order to support current, and future, versions of Outlook these DNS records have now become a necessity, not a ‘nice to have’.

The University strongly recommends that each unit/college/department who manage their own DNS should create an autodiscover entry.  This is the recommended solution for both on on-premises Exchange and when mailboxes are in the Office 365 cloud. It therefore takes care of Nexus now and into the future. You should ensure that your DNS includes an autodiscover CNAME or A record for your domain name (such as autodiscover.it.ox.ac.uk) which can be used to resolve all related email addresses. These should point to autodiscoverredirect.nexus.ox.ac.uk.

Once all of that is done:

To improve performance for Outlook 2016 you may also wish to use the following Registry settings which will force Outlook to bypass root domain discovery and redirect to the autodiscover CNAME or A record to resolve the address. This saves a little lookup time by bypassing initial root domain queries.

In the key HKEY_CURRENT_USER\SOFTWARE\Microsoft\Office\16.0\Outlook\AutoDiscover create/modify a DWORD value of ‘ExcludeHttpsRootDomain’ with a value of ‘00000001’.

Group Policy can do this too via ‘Exclude the root domain query based on your primary SMTP address’ setting.

Posted in Uncategorized | Comments Off on Autodiscover: no longer optional

BlackBerry Enterprise Server: the end is nigh?

The Nexus team have maintained a BlackBerry Enterprise Server since the inception of the Nexus service. At its peak there were many hundreds of users for this service. For some time a BlackBerry handset was the mobile device of choice among both University staff and students.

Those glory days have gone. Nexus’ user base has predominantly moved to Android and iOS devices. Even those die-hard BlackBerry fans who are loyal to the firm have been moving towards ActiveSync connections for mobile Nexus email, rather than pay for a corporate licence to use the Enterprise Server service.

The last month has seen corporate BlackBerry usage decline to a new low – fewer than sixty users’ devices have made contact. The most modern BlackBerry handset we have had connecting to the servers over that time is a 9720 model, introduced back in 2013. Many others are using models from the 2007-2008 era: none are likely to be supported by vendor warranty.

From the Nexus team’s perspective the part that we look after operates via two high-availability servers and a back-end SQL database.  This set-up has proven to be solid, reliable, and stable over the years and we have no anticipation that that will change any time soon. The server software is elderly, but still vendor-supported. However we have recently re-evaluated our position, particularly in light of the declining usage of corporate-licenced BlackBerry devices.

The BlackBerry server software does not support the current range of BlackBerry handsets. In order to support these newer devices our server software would have to be upgraded. More importantly the version change requires users’ devices to be re-licenced (at cost). The expense and effort required to do this does not make good financial sense for a system hosting so few users.

We are minded to put a ‘Do Not Resuscitate’ notice over this service, should any serious issue occur which is not easily rectifiable. Please note that there are no immediate plans to withdraw corporate BlackBerry services, and it remains operational for your University users who do still have these handsets on those licenced contracts.

BlackBerry users who use BIS, or ActiveSync, to connect to Nexus will be unaffected regardless of whether there is a Nexus BlackBerry Enterprise Service: if you have never bought a corporate licence for your users’ BlackBerry devices to use the Nexus BlackBerry service you can relax. Those users don’t use the Nexus BlackBerry servers and will be unaffected whatever we do with them.

We believe that it would be in your best interest to liaise with your BlackBerry users and identify if those devices are still being actively used. When your users’ BlackBerry devices come up for replacement we would advise that you consider Android, iOS or other ActiveSync-aware devices rather than a corporate-licenced BlackBerry from now on. Newer OS10 BlackBerry handsets, although about to be withdrawn from sale, do support ActiveSync connectivity if your users remain a fan of the platform.

Posted in Uncategorized | Comments Off on BlackBerry Enterprise Server: the end is nigh?

OneDrive for Business sign in failure

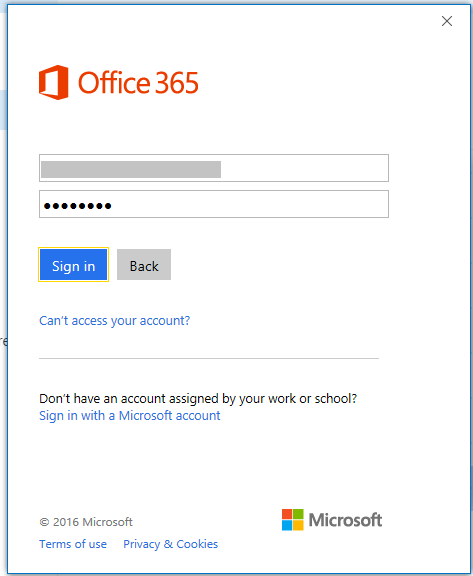
I’ve been setting up a new PC – a fresh installation of Windows 10 – and wanted to reconnect to my OneDrive for Business content. Windows 10 includes the client natively so there’s nothing to install. I pasted in the link to my site, asked to sync, and got the usual prompt for logon credentials.

onedrive

Now this part should be easy – put in your email address and password and click ‘sign in’. But, no, it’s not that simple. The sign in button didn’t work. I tried quitting GROOVE and MSOSYNC processes. I checked my password was correct by logging into the site via a browser. It worked.

So the issue was solely down to that ‘sign in’ button not wanting to notice a click (or lots of clicks: I was getting frustrated by this time). Finally, and by chance, an old-school solution came to hand: hitting the ‘enter’ key on the keyboard does the job.

Posted in Uncategorized | Comments Off on OneDrive for Business sign in failure

Colour-coded SharePoint calendars

I needed to create a team calendar in SharePoint which, by default in SharePoint 2010, doesn’t give you an option for colour-coded categories.
So, what follows is a workaround (and a bit of a faff, to be honest) but it gives you what I was aiming for.

Permissions

I’m starting with the assumption that you already have a SharePoint calendar, or know how to make one via ‘Create new content’. But you may not have the rights to do the tinkering: you need access permissions which are sufficient to let you play with list settings:

1

Once you’re looking at the list settings you need to scroll down past ‘List Information’, ‘General Settings’, and ‘Content Types’ to find the ‘Columns’ section.

Within ‘Columns’ you’re looking for ‘Category’. Click on that.

Categories

On the right-hand side of the page we’re only interested in the bottom half of the options available. To ensure that every calendar item is categorised, leave ‘Require that this column contains information’ set to ‘Yes’. leave ‘Enforce Unique Values’ alone (set to ‘no’).

Below that, this is where you create the list of categories you want to have available under ‘Type each choice…’. In my case this was for a team availability calendar so I put in entries like ‘Holiday’, ‘Training’, and ‘Public Holiday’. You can have up to ten of these (because of a limitation we’ll see later on the number of overlaid calendars):

2

Create calendar views

Return to the calendar and under ‘Calendar Tools’ create a new view, named sensibly to match one of your previously entered categories. Then, underneath it, click ‘Modify View’.

3

The things you might want to change are the ‘View Name’, the ‘Default Scope’ (most of the time the week view makes the most sense), and then the Filter. It’s the filter that is crucial to make all of this work.

4

In this example, as you can see, the filter only shows items when the  category (which you’ll remember we made a mandatory entry) matches up with one of the ones you’re expecting to see. You will now need to go back and create more views in the same way, with each new view modified to only show entries that match the appropriate category (i.e. the view for Holiday should filter so it only shows entries in the ‘holiday’ category).

Overlay calendars

Now we need to take all of the calendars you’ve created and overlay them. Each one will have its own colour-code, with the available choices dependent on the theme you have for your SharePoint site.

5

When you’ve clicked on ‘Calendars Overlay’ you’ll see a ‘new calendar’ button – this is how you get each category to appear on one page – and you’ll see just below that you can have a maximum of ten overlaid calendars. This is why we had a limit of ten categories earlier.

On the righthand side you can give each overlay a name but the important part is the colour selection. Don’t try and remember the URL yourself – the ‘Resolve’ button does that bit of hard work for you – and will then let you pick the overlay you want as the ‘list view’.

6

The ‘always show’ button should NOT be ticked, although this seems counter-intuitive, as having it ticked will actually create duplicate calendar entries.

Again, you’ll need to repeat this step several times, adding each category’s calendar into the overlay (with a different colour each time)

Eventually you’ll see the full list of your categories all being visible within the main top-level calendar.

7

The final step is to test that it all works as expected, by creating some entries. You should find that the ‘category’ field has a red asterisk to indicate it’s mandatory (and of course shows the categories that you want).

8

If you’ve done it right, it’ll look something like this. As an added bonus, if it gets a bit too busy to spot something, the lefthand column isn’t just a key: it lets you see just one particular category of entry at a time:

9

Posted in Uncategorized | Comments Off on Colour-coded SharePoint calendars

BlackBerry Enterprise Server 5 versions

Mostly for my own reference, here are the numbers you’ll see in ‘Add/Remove programs’ and which version of the BES software they correspond to:

The bundle number is important when you need to find out which version you are running. It is listed in “Add/Remove Programs”.

Version Version update name Bundle
5.0 223
5.0 Maintenance Release 1 236
5.0 Maintenance Release 2 244
5.0 Maintenance Release 3 255
5.0 Maintenance Release 4 267
5.0.1 Service Pack 1 70
5.0.1 Maintenance Release 1 82
5.0.1 Maintenance Release 2 117
5.0.1 Maintenance Release 3 139
5.0.2 Service Pack 2 36
5.0.2 Maintenance Release 1 51
5.0.2 Maintenance Release 2 96
5.0.2 Maintenance Release 3 119
5.0.2 Maintenance Release 4 133
5.0.2 Maintenance Release 5 146
5.0.3 Service Pack 3 33
5.0.3 Maintenance Release 1 41
5.0.3 Maintenance Release 2 53
5.0.3 Maintenance Release 3 93
5.0.3 Maintenance Release 4 107
5.0.3 Maintenance Release 5 143
5.0.3 Maintenance Release 6 163
5.0.3 Maintenance Release 7 227
5.0.3 Maintenance Release 8 256
5.0.4 Service Pack 4
(Minimum starting level for those below to install)
38
5.0.4 Maintenance Release 1 52
5.0.4 Maintenance Release 2 70
5.0.4 Maintenance Release 3 86
5.0.4 Maintenance Release 4 100
5.0.4 Maintenance Release 5 116
5.0.4 Maintenance Release 6 128
5.0.4 Maintenance Release 7 160
5.0.4 Maintenance Release 8 183
5.0.4 Maintenance Release 9a 198
5.0.4 Maintenance Release 10 223
5.0.4 Maintenance Release 11 234
5.0.4 Maintenance Release 12 261
5.0.4 Maintenance Release 13 278

SP4 MR13 released 26th January 2016 and still current at 14th June 2017.

Release Notes for Sp4 MR13 (PDF)

Posted in Uncategorized | Comments Off on BlackBerry Enterprise Server 5 versions

Outlook Anywhere versus MAPI over HTTP

Outlook Anywhere has been around for a very long time now. Back when it was young nobody was really thinking seriously about the future routes from which a desktop client might access Exchange, such as from a cellular phone network or while flying across the Atlantic.

So, Microsoft have done some thinking, resulting in a revamped version of Outlook Anywhere for Exchange 2013 SP1 and Outlook 2013 SP1.

Here’s the good news:

  • That annoying ‘Connecting to…’ message from when you first open Outlook should be significantly reduced. In Microsoft’s tests, a 70% improvement was achieved for monitored clients. That could translate to a 30 second wait on your slow mobile-data connection instead of the 90 seconds it might take now.
  • When resuming from hibernation, or reconnecting, you can expect to shave ten seconds off the usual forty or so.
  • There is better (and simpler) server-side monitoring, via less complex network encapsulation and more useful data in HTTP header information.
  • You can expect an improved Autodiscover response. MAPI/HTTP has no need for us to advertise authentication settings – all you need from the server is the protocol version and the endpoint URLs, which can be used without modification. The authentication settings are requested via a standard anonymous HTTP request, just like other web protocols, so no special configuration (or reconfiguration) is needed when they’re updated.
  • There are fewer concurrent TCP connections required between client and server (and there’s faster renegotiation in the event of a connectivity blip, with sessions kept open for 15 minutes rather than needing to be re-established).
  • The simplification allows multifactor authentication to be more easily added in the future (it’s on the roadmap for later this year).

At the moment Nexus’ system runs Exchange 2010 SP3 so we can only gaze admiringly at these new features until we too get the green light to upgrade to Exchange 2013. When we do, we’ll go straight to SP1 and turn all of this on…

In the meantime, though, let’s deal with some of the inevitable questions.

How have they done this?

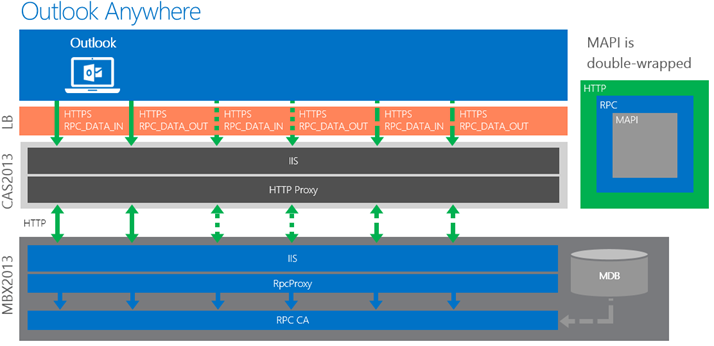
Outlook Anywhere has historically relied on a  heavily-disguised MAPI request, encapsulated in an RPC packet, which is in turn wrapped up in an HTTP request. It’s this double-wrapping that Microsoft have been striving to remove.

Nexus’ current Outlook Anywhere set-up requires two long-lived TCP connections to be held open for each session between Outlook and Exchange. This is done via an RPC_DATA_IN and an RPC_DATA_OUT connection, with both required for each client’s RPC/HTTP session. If these are dropped, or lost, they need to be completely re-established from scratch, with all the associated overhead you’d expect. In terms of network overhead, traffic, cost and logic, this represents an overly complex way to do things, with knock-on impacts to perhaps thousands of users simultaneously. Switching from Outlook Anywhere to MAPI/HTTP means that your sessions are retained for 15 minutes; in the event of a blip the client can simply reconnect and continue where it left off, without needing to re-establish the session first.

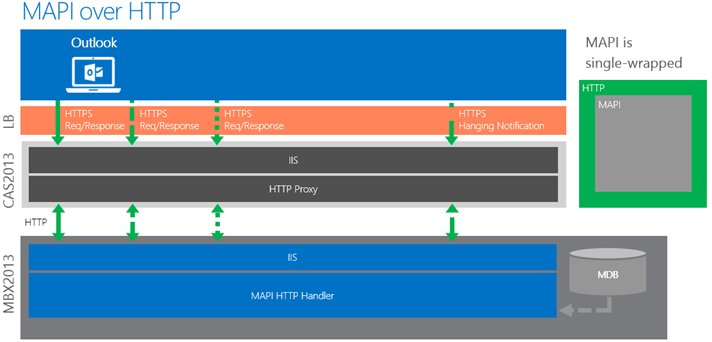
This new MAPI/HTTP connection supplements Outlook Anywhere with a completely different way of doing things: the TCP connection established between the client and server only needs one long-lived connection and a secondary ad hoc connection. By also removing the additional RPC encapsulation overhead from within the HTTP packets (it’s now just MAPI and HTTP) the entire process is simplified, made faster, and as a further bonus it means that the HTTP headers will contain more meaningful data.

If you’re on a very slow, or low quality, network this is undeniably a good thing. It’s also good for us as administrators: we won’t see a surge of quite so many RPC/HTTP connections all being re-established at once. Less server overhead at times like that equals a faster recovery for Nexus users after, say, a short-lived network issue.

mapihttpmapihttp2


What do we need to do at Oxford IT Services to get this?

  • All of Nexus’ Client Access Servers will need to be upgraded to Exchange 2013 (and have SP1 deployed to them, since that’s what adds this functionality). Incidentally this new function is disabled by default so that it doesn’t introduce unexpected behaviour for anyone just doing a Service Pack upgrade.
  • End users will need a client that is MAPI/HTTP aware. Today this means you need Office 2013, also updated to run Service Pack 1, as nothing else is yet MAPI/HTTP aware.


Any pitfalls?

  • The increase in short-lived HTTP connections will require additional CPU resources on Client Access Servers. This is an issue for anyone who designed their server environment around Exchange 2013’s original RTM requirements, potentially needing 50% more CPU resource. This isn’t an issue for us, however. Exchange 2010 – our current version – has yet-higher CPU requirements so, for us, an upgrade to Exchange 2013 arguably leaves us with over-specified hardware.
  • .Net 4.5.1 will be required on Exchange servers since it fixes issues which would otherwise cause longer wait times for end-users.
  • On a perfect network, with no dropped connections, there is a slight increase in network overhead, of an average 1.2% for 50KB average packets. For larger transers over 10MB this increase could be up to 10%. However on  slow low-quality networks the simplification of the overall packets, and the ability to resume a dropped connection, will more than offset this increase.
  • MAPI/HTTP is a new CAS endpoint, so needs to be factored into namespace design (including certificate handling).
  • MAPI/HTTP is an organisation-wide option and not intended to be a server-specific one (although a registry key can be used to disable it on individual servers,  where required).
  • Unified Access Gateway doesn’t yet support MAPI/HTTP (although support is planned via an update)


Posted in Uncategorized | Comments Off on Outlook Anywhere versus MAPI over HTTP