Visio 2007 Tips and Tricks

Recently I decided to up my Visio-fu, and also to settle on a set of standard templates and shapes for my network diagrams. A quick browse around Safari Books Online turned up three Visio tomes, so on a quiet weekend morning I thumbed through Microsoft Office Visio 2007 Inside Out. Here are some tips and tricks I picked up along the way:

  • The Workspace is where your diagram is created
  • Workspaces contain Shapes joined together by Connectors
  • Save Workspace layouts, perhaps with default Titles, as a Template for re-use
  • Find out what’s in the Workspace by going to View -> Drawing Explorer
  • A document can contain multiple Pages (workspaces) each using a different scale, and with hyperlinks between them
  • Pages in a single document might be useful for high, medium and low level detail in your diagrams
  • Hyperlink Shapes are hidden in the Borders & Titles Stencil
  • Stencils are the “folders” on the left hand side which contain Shapes (strictly, Master copies of them)
  • Create your own Stencils (File -> Shapes -> New Stencil); drag favourite Shapes in from the Workspace (a new Master is created)
  • You can distribute the custom Stencil around your team, to encourage common conventions
  • Shift+Ctrl+Left Click for Zoom In, +Right Click for Zoom Out, +Right Drag for Panning
  • Drag new alignment guides out from the horizontal and vertical rulers (NB: they will not appear on a printout)
  • To set a horizontal or vertical Ruler’s zero point, Click+Drag the other Ruler
  • Go to Tools -> Snap and Glue to select the Dynamic Grid option for much improved alignment guide support
  • Visio has Layers (like a poor cousin of Photoshop, who knew?!) – go to View -> Layer Properties
  • Use Layers to add annotations (call-outs or balloons) to diagrams which can be hidden for printing
  • When the Connector Tool is enabled, dragging Shapes in from a Stencil will also automatically join them
  • Alternatively to join Shapes, click the workspace shape, click the other shape in the stencil, then click the blue arrow on the workspace shape
  • If you anchor a connector to the shape core rather than an anchor point, dragging the shape around also moves the connector
  • Right click on a connector (a line) and set to Straight or Curved
  • Straight lines have their “jumping” of crossed connectors enabled via the Format -> Behavior dialog
  • Use the Pencil Tool to alter the lines and vertices of Shapes; Ctrl+Click to add a vertex, Ctrl+Click on a vertex to reveal modification handles
  • When using the Ellipse Tool, hold down Shift to draw a regular circle
  • If you group shapes together (Shift+Ctrl+G, very useful) but want to edit the group, go to Edit -> Open Group
  • Ctrl+D will duplicate your selection on the Workspace
  • Various operations (combine, intersect, etc) are available for shapes if you look in Shape -> Operations
  • Themes are a little publicised gem, useful for reformatting all your text, lines, boxes etc in one go
  • To apply current format settings to a shape, use the Format Painter button on the Standard toolbar (sweeping brush), or Shift+Ctrl+P
  • Clicking a shape and then starting typing is the simplest way to add text; hit Esc when you are done
  • Switch to the Text Block Tool (hidden below the Text Tool button) to move/rotate text if you can’t see the move/rotate handles
  • Setting the background (fill) colour on connector labels will make the text stand out nicely
  • Don’t forget Tools -> Autocorrect Options to turn off annoying auto-corrections

Phew, that’s my lot, but do you have any other tips? Please comment. I hope this helps!
Posted in Documentation, Productivity | Comments Off on Visio 2007 Tips and Tricks

Changes in the core

On Tuesday 2nd March we made two significant changes in the Core. Both are inline with current Cisco best practice are have been implemented as part of our Backbone ‘feature update’ project.

VTP

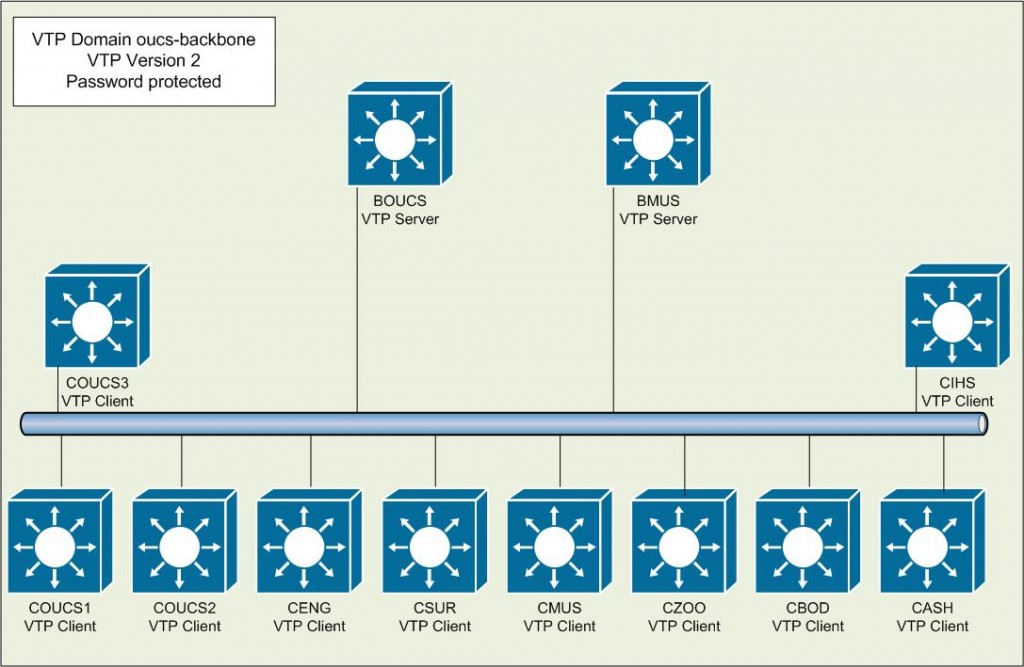
We have moved to using VLAN Trunking Protocol (VTP) In the core. This allows us to maintain a central VLAN database and simplifies VLAN provisioning. Further, we are now able to name each VLAN which will aid troubleshooting and design. The two ‘B’ core switches, BOUCS and BMUS are now VTP servers, with the remaining ‘C’ switch/routers acting as clients.

At the time of writing the FroDo network is in VTP transparent mode (effectively the feature is switched off) and in a different domain. Over the coming weeks we will move the FroDos into the same VTP domain as the core.

Oxford Core VTP Logical

Oxford Core VTP Logical

RSTP

We have migrated the Core from IEEE 802.1D STP protocol to Rapid Spanning Tree Protocol plus (RSTP+). The main advantage is that convergence will take approximately 5 seconds, as opposed to the circa 50 seconds taken by 802.1D.

RSTP+ is fully backwards compatible with 802.1D; for the time being we are still running 802.1D on the FroDo network.

There has been an unexpected side effect which is that some sites not running any form of STP are experiencing intermittent packet loss. Please note that although you may not have any redundant links, the Core does, so it is important to enable the feature.

Jeremy Stretch has written an excellent blog on the subject: here. I highly recommend subscribing to this blog if you use Cisco equipment.

Over the coming weeks we will migrate the FroDo network to RSTP+. Each migration may cause an outage of circa 5 seconds to the connected Units. Therefore the migrations will take place during the JANET at risk period of 07:00 – 09:00 on a Tuesday morning.

Posted in Backbone Network, Best Practices, Cisco Networks, Services | Comments Off on Changes in the core

Visitor Network account lifetime

Several comments on my recent post about updates to the Visitor Network Account Management tool requested an increase of the maximum account lifetime. Whilst this is more of a policy change than a feature update to the tool, and hence probably appropriate for consideration at the Network Advisory Group (NAG), I thought some explanation here would be appreciated. I’ll certainly take this item to the next meeting of NAG for discussion.

You can create accounts in two ways: either one-at-a-time within an existing group, or in bulk at the same time as creating a new group. The subtlety comes in that these two methods of account creation have, quite deliberately, different maximum lifetime limits. Individual accounts have a 14 day limit and bulk created accounts inherit the lifetime of their parent group, which can be up to 92 days.

So the quick answer to the comments is that yes, you can already create accounts with a lifetime of up to a term, but they must be created along with a new group. As groups and accounts are “cheap and disposable” we see no problem in you using this as a way to achieve what you want. Admittedly you have less control over the data on bulk created accounts – the visitor’s name and so on – but we will address that in the updates mentioned in my previous post.

But there’s more: on the group setup page is a field named “valid for X consecutive days“, for use with bulk account creation. This allows you to set a start and end time for the group/accounts which becomes a window of opportunity, within which the account can be used for X days since first log-in. So let’s say you create a group of 50 accounts with a lifetime of 92 days, but set them to have 21 consecutive days validity. You can give the accounts to visitors and they have a lifetime of only three weeks from first use, but you need only create that group once a term.

Why the different maximum lifetimes, then? Well, it’s not random and we did consider carefully how the service would be used, and potentially abused; remember that we need to maintain accountability at all times as to who is accessing the network. One concern is that accounts with a long lifetime will either be traded between users, or have the credentials disposed of and subsequently recovered and used by a 3rd party.

If you know, for example with summer school attendees, that they are here for a few months, then you can create a group of accounts with an extended lifetime. But for the majority of cases the visitor will be short-term and single account creation is adequate. Remember also that it’s often non-IT staff issuing accounts via delegated access to the tool, so we need to moderate their actions in a way which might not be necessary for an IT Officer -only tool.

I think the above answers the questions raised, but if you still feel strongly, please do let me know either by email to networks@oucs.ox.ac.uk or in a comment below. If you do, it would be useful to have an example of your use case – possibly we can tweak things to accommodate your scenario whilst continuing to safeguard access to the JANET network.

Posted in Documentation, Services, Wireless | Comments Off on Visitor Network account lifetime

Updates to the Visitor Network Account Management Tool

Note: this post relates to a private service for University of Oxford IT Support Staff.

It’s been some time since the Visitor Network account management tool, which you use to create network access accounts for visitors to the University, has had any development. As a result we’ve built up a list of feature requests which I’m preparing to work through over the next month or so. I thought it might also be useful to poll you for more suggestions, so please feel free to add comments to this post if you have more ideas I can fold in.

Some of these changes are minor updates to the page text, others more major development, so here they all are in no particular order:

  • Add a note about there being a max. of 300 accounts when bulk generating
  • Add a variable number of leading zeros to auto-generated account names such that they can sort correctly in a list
  • Tweak password generation rules so they don’t begin or end with a symbol (non-alphanum)
  • The 14 day one-off account lifetime-limit is actually 13 days and 45 minutes
  • Show/hide columns in the various tables (e.g. sponsor, purpose in the Account List)
  • Have confirmation dialog boxes when deleting accounts or groups
  • Send username/password to a visitor via SMS
  • Fix IP accounting so we have byte counts both in and out once again
  • Upload comma separated list of visitor names when bulk generating accounts (as alternative to auto-generated names)
  • Download comma separated list of the account names and credentials within a custom group
  • Make default start/end times for accounts more sane (e.g. start now, rather than in the future)

Note that it’s not guaranteed we’ll manage to implement all of the above, particularly the column show/hide one which I suppose will need some Javascript.

I’m particularly interested in the ability to SMS credentials to the visitor. This would be helpful (1) if you have to set the account up for someone over the telephone, and (2) for PDA/smartphone users who would prefer to copy/paste than enter text. I’ve done some basic tests with the new OxSMS service from the Telecoms team and I think we’ll be able to do this quite easily. We could perhaps offer either to send the SMS immediately, or say one hour before the account is due to become active.

So, if you have any more suggestions to add to the above list, please either leave a comment below, or email us at networks@oucs.ox.ac.uk.

Posted in General Maintenance, Services, Wireless | 1 Comment

Logging from iptables

We recently had a problem to troubleshoot on the wireless network, which was quickly resolved through simply having effective logging from iptables.

In case you didn’t know, iptables has a LOG target which can direct messages to the local syslog service regarding the matched packet. It’s a non-terminating target so you can log and still continue to process the packet in other ways. The LOG target is commonly used just before the DROP target, but in our case we do something slightly different to many of the cookie-cutter iptables scripts out there on the Internet.

First we set the log level using the –log-level option. This allows us to collect the iptables logs using syslog-ng and direct them to a special file, separate from the other Kernel logs. The iptables logs can have quite a large volume, so it’s useful to be able to look at other Kernel logs without the noise, or equally to grep the iptables logs in isolation.

Next we employ the –log-prefix option each time we call upon the LOG target. So there are two points here: first, try to log and drop often throughout your rules, which will reduce the processing overheads for iptables. Second, multiple calls to LOG allows multiple –log-prefix parameters. We use this parameter to describe why we dropped or rejected the packet, using simple tags such as “[BAD-STATE]” which work well with grep.

In this particular case, the dropped packets had protocol 47 – GRE, and we had neglected to load the iptables conntrack helper module for GRE on this firewall. It was simple to find the cause by having good firewall logs in place. Do you have any other tips for firewall logging from iptables?

Posted in Best Practices, Firewall, Wireless | Comments Off on Logging from iptables

Wireless – what could possibly go wrong?!

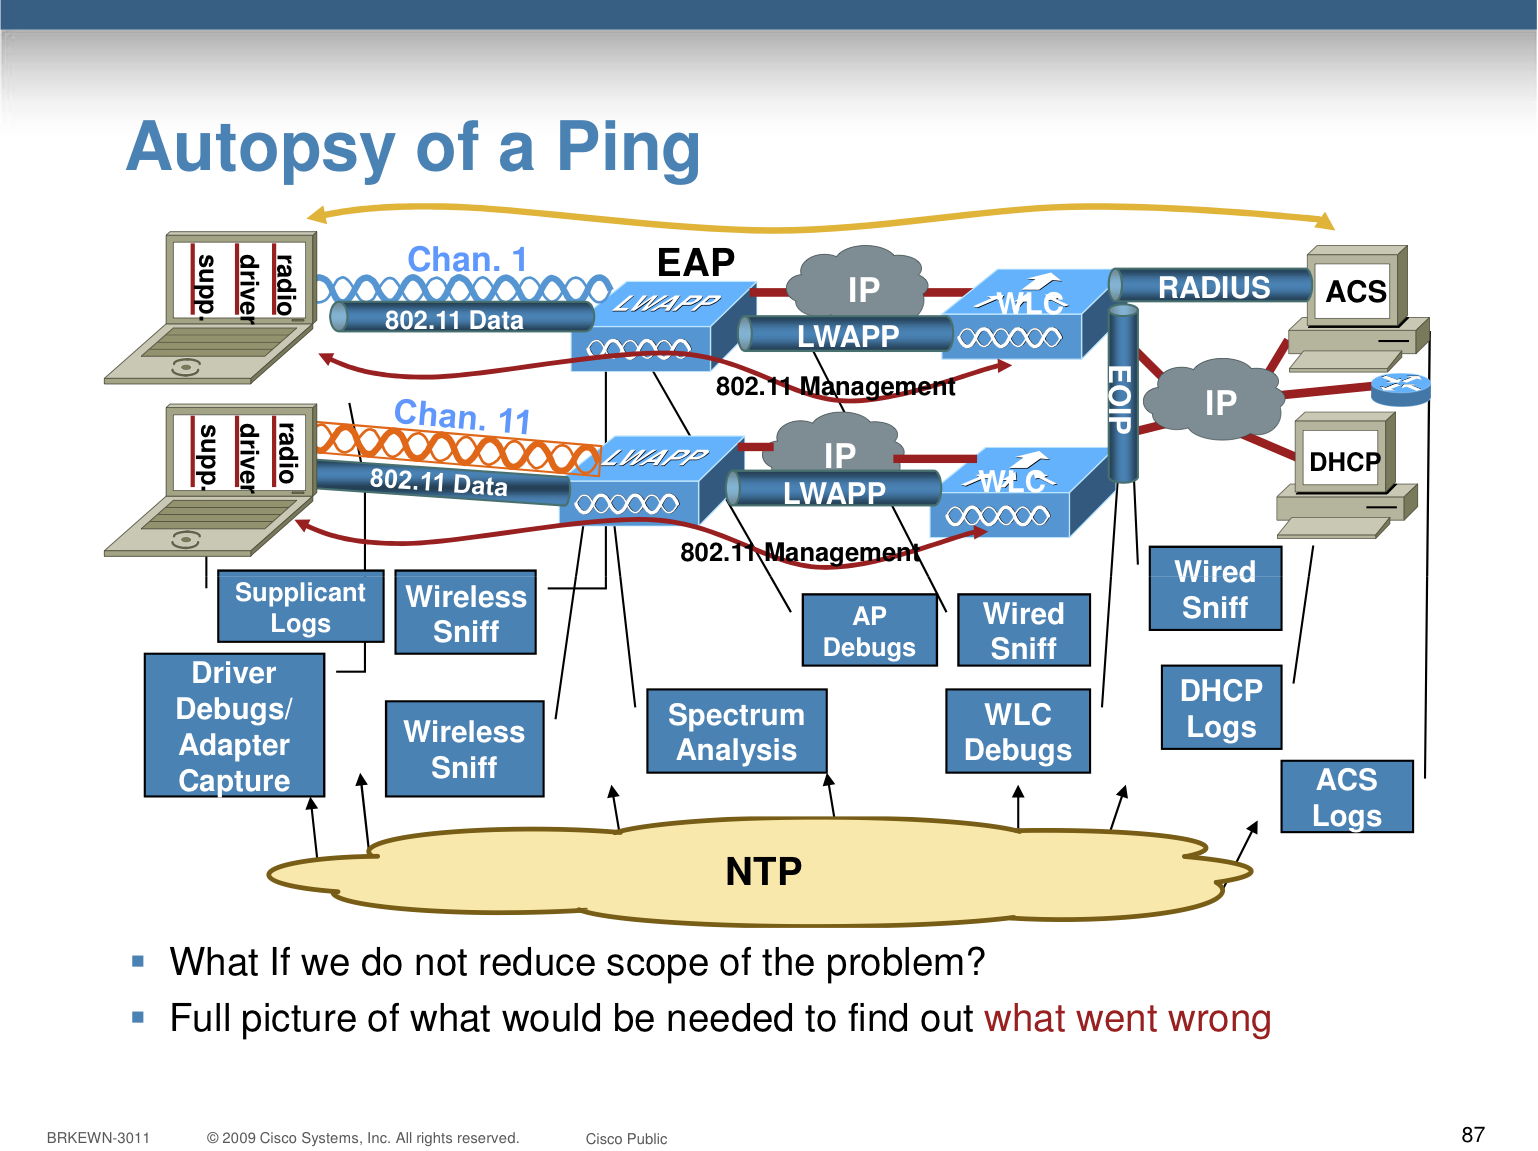
I love this slide from a Troubleshooting Wireless Networks talk I attended last week. It says a lot about how difficult it is to tackle trouble tickets of the “client can’t connect to network” variety.

Anatomy of a Ping

Autopsy of a Ping

Posted in Cisco Networks, Wireless | Comments Off on Wireless – what could possibly go wrong?!

Special-use IPv4 addresses and domains

You’ve probably heard of RFC1918 – the well-known set of networks assigned for use in off-Internet, private networks. In fact there’s a much more useful RFC, one which lists not only these but a group of other networks and subnets assigned by IANA for so-called “special purposes”. Networks have been reserved for many uses including documentation, benchmarking tests, and of course the loopback network 127.0.0.0/8 to name but a few.

RFC5735 has recently been released to update this list, and it’s a short read that’s well worth running through some time with a cup of tea. One new highlight in this updated version is that there are now three subnets assigned for documentation purposes. This means if you’re documenting an example network topology with routing, you can use the three example subnets given:

192.0.2.0/24
198.51.100.0/24
203.0.113.0/24

In the same vein, there’s also RFC2606 which details reserved domain names that can be used for either documentation or private systems. Both RFCs help to extend the lifetime of documentation by making it more generic, useful and readable.

P.S. You can track new RFC releases at this RSS feed: http://tools.ietf.org/html/new-rfcs.rss

Posted in Best Practices, Documentation | Comments Off on Special-use IPv4 addresses and domains

Cisco firewall SMTP “fixup” considered harmful

This issue is old and familiar to us, and crops up about once every six months or so. I thought it might help to document the situation more publicly.

On Cisco firewalls (PIX or the newer ASA), various protocol inspection engines are available. Generally, they assist in tracking connections of IP traffic through the firewall. That is, for a protocol such as FTP various additional TCP connections are made alongside the original connection, and the firewall needs to know to allow these through. The inspection engines perform simple analysis of traffic to watch for and set up these so-called pinhole ports, on demand.

Trouble is, some of the inspection engines have suffered feature creep and now try to work out, I guess, the semantics of the exchange taking place. If the engine thinks the conversation contains “illegal” requests, it’s blocked.

In particular the SMTP inspection engine (also known as a fixup in the Cisco docs) is fairly notorious for messing about with email transfer and preventing successful delivery. At best you might experience mysteriously missing attachments, at worst the remote server simply sees a TCP connection reset and has no idea why delivery failed.

Here’s how to tell if your Cisco firewall is interfering with your mail server’s operation. Telnet to the mail server (we assume the firewall sits in front of it) on the standard port of 25, and look at the “banner” response. On a regular mail server the banner looks something like this:

host:~$ telnet oxmail.ox.ac.uk 25
Trying 129.67.1.161...
Connected to oxmail.ox.ac.uk.
Escape character is '^]'.
220 relay0.mail.ox.ac.uk ESMTP Exim 4.69 Thu, 26 Nov 2009 19:28:51 +0000

However on an affected server, the banner is noticeably different:

host:~$ telnet suspectserver.example.com 25
Trying 192.0.2.1...
Connected to suspectserver.example.com.
Escape character is '^]'.
220 *****************************************************************************

Disabling the SMTP fixup (which is on by default, I believe) enables mail to flow as it should. I recommend you do this on any PIX or ASA devices in your network.

Note that the fixup seems to interfere with email going through the firewall in both directions, and problems occur regardless of the mail server software being used in the communication (after all, all servers are speaking the same SMTP protocol language).

Posted in Cisco Networks, Firewall, Mail Relay, Message Submission | 9 Comments

Webcache Hardware Refresh

Our servers are kept in warranty/hardware support so that hardware failures can be quickly replaced with minimum effect on the service. The webcache has had new hardware purchased for it to replace hardware going out of warranty. I’ve been preparing the new hardware installation for deployment. This includes working out which configuration from the existing service is needed and what is historical that can be dropped. The new software is also a newer operating system and proxy software so any configuration syntax has to be checked in case it’s deprecated or replaced.

The existing webcache configuration dates back to when traffic to the ja.net network was costed on usage, and so a interception large webcache cluster was in place to reduce costs. Since then the pricing model changed and the single webcache that replaced the cluster was made available via configuration only rather than transparently sitting between the Internet and the clients. The webcache that is about to be deployed will be with the university for 5 years, so although the configuration to replace the existing service is now complete, I’m also taking measures to make sure the new proxy will work correctly with IPv6 which will be with the university well before the server is retired.

We use Squid for our proxy, (there’s not much point in keeping that secret). For native IPv6 to work we need to deploy version 3.1 which is still currently in release candidate status, which roughly means beta testing has finished but the final release hasn’t quite been completed to their satisfaction. I’m not keen on deploying a release candidate in a production service (although it’s been fine in testing) so in the meantime

  • I’ve worked on the packaging needed with the release candidate to match it to the operating system used
  • I’m going to plan and configure the IPv6 configuration for the host, with an eye to deploying it with this configuration tested pre deployment but turned off at first
  • I’m keeping an eye on the open issues with the release candidate on the squid developers mailing list

I’m hoping that by the time the first two are complete the final release will be deployed. If not we can deploy the distribution default version of squid and upgrade later but I’d like to get it all out of the way in one go.

Note that nothing will change with the core webcache behaviour and client configuration settings when the new hardware is introduced.

Posted in General Maintenance, Services, Web Cache | Comments Off on Webcache Hardware Refresh

Fixing the iPhone OS WiFi auto-login problem

Some time ago, shortly after iPhone OS 3.0 was released, we received a number of reports from users that our VPN-based wireless service had become unusable. For those not familiar with this service, OWL is one of our local wireless networks that permits VPN access for university members whilst providing a captive-portal for visitors. Normally the dual-use works quite well: university members start the VPN client and visitors start a web browser to log in.

Not so for OS 3.0 users though, who joined the wireless service only to be automatically shown the visitor login page, and then when they closed that down the iPhone or iPod Touch would just disconnect from OWL in a huff. There was no opportunity to start the VPN client.

A mail list post by James Hooper, a Network Specialist at Bristol University, explained all: it seems the device tests for Internet connectivity by attempting to retrieve a specific web page. So all we need to do is trick OS 3.0 into thinking this page is accessible.

According to James, the page in question lives at http://www.apple.com/library/test/success.html and should return the following, to be considered a success:

<!DOCTYPE HTML PUBLIC "-//W3C//DTD HTML 3.2//EN">
<HTML>
<HEAD>
<TITLE>Success</TITLE>
</HEAD>
<BODY>
Success
</BODY>
</HTML>

We know that all clients attempting HTTP requests on OWL will hit our captive portal web servers. These servers are already configured to capture URLs and redirect clients to the Visitor Network login page. All we need do is configure those servers to first check for a request to success.html and return the fake content instead. The excellent mod_rewrite Apache module comes to our rescue, and we end up configuring something like the following:

# apple captive portal detection
RewriteRule    ^/library/test/success.html$    -    [L]

The above line tells Apache that if the request matches this text, then it should stop processing and serve the file locally (a copy of success.html is saved on the server). Just after that instruction, we capture every other request and issue a 302 redirect to the captive portal login page.

I’m told that Apple did acknowledge this bug, and perhaps even fixed it in OS 3.1, although brief tests were not conclusive. Regardless, it’s better for us to leave this monkeypatching in place to avoid users having further difficulties in connecting.

Posted in VPN, Wireless | 4 Comments